| (12 intermediate revisions by the same user not shown) | |||
| Line 4: | Line 4: | ||
'''Passive Income'''<br /> | '''Passive Income'''<br /> | ||
Staking $BYTES enables individuals to earn a passive income or yield that would not be possible if their tokens were left idle in their wallets. This yield accumulates daily and can be claimed at any frequency. | Staking Citizens and $BYTES enables individuals to earn a passive income or yield that would not be possible if their tokens were left idle in their wallets. This yield accumulates daily and can be claimed at any frequency. | ||
'''Increased Earnings'''<br /> | '''Increased Earnings'''<br /> | ||
| Line 31: | Line 31: | ||
Now that you have completed the migration, let's proceed with staking your Citizen by following these simple steps: | Now that you have completed the migration, let's proceed with staking your Citizen by following these simple steps: | ||
1. Return to https://neotokyo.codes/ and connect your wallet using the option in the top right corner. <br /> | |||
2. Once your wallet is connected (indicated by a green glow), click on it. <br /> | |||
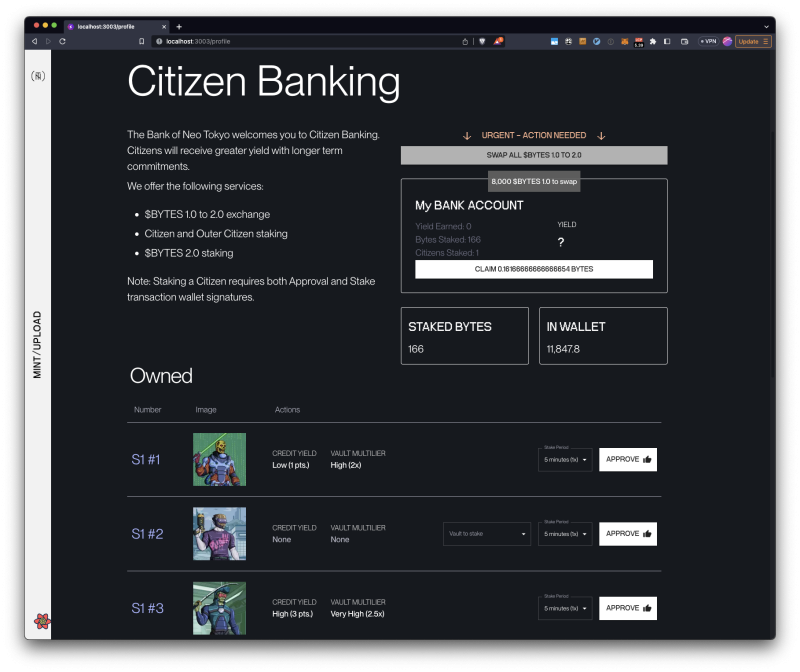
3. Choose your Citizen and approve them for staking. <br /> | |||
[[File:stake1.png|800px|thumb|left|Select a Citizen for staking.]] | |||
<br clear=all> | |||
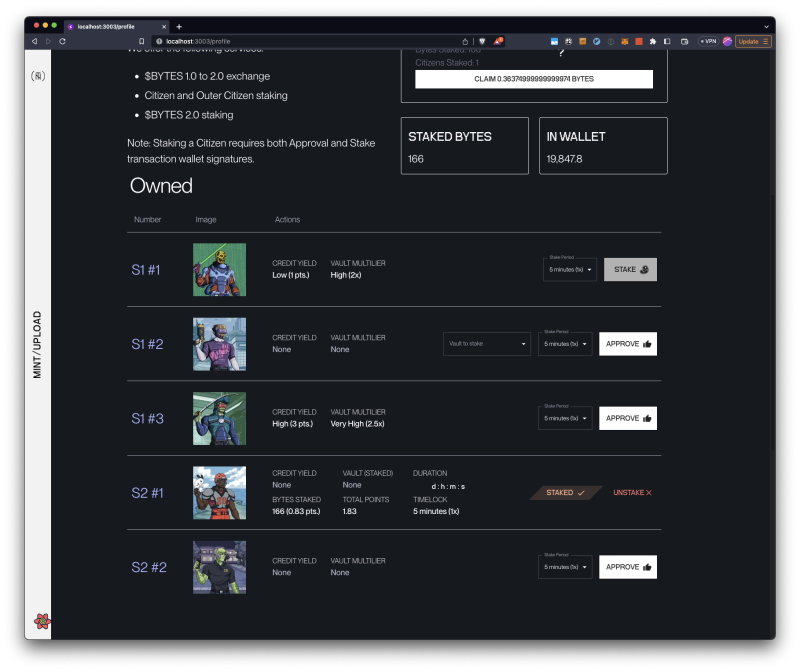
4. Decide the desired staking duration for your Citizen, selecting from the available options: 1 month, 3 months, 6 months, 1 year, or 2 years. Keep in mind that longer staking periods yield greater rewards, but the Citizen cannot be unstaked until the chosen period concludes. <br /> | |||
5. If your S1 Citizen does not have a vault already attached, you are able to select an unattached vault to stake with your Citizen for the same staking period. <br /> | |||
6. When ready, click on the "stake" button (depicted by a steak icon ). <br /> | |||
[[File:stake2.png|800px|thumb|left|Select a duration for staking and click the "stake" button.]] | |||
<br clear=all> | |||
====Soulbound Citizen Token==== | ====Soulbound Citizen Token==== | ||
As staking necessitates locking the Citizen in a staking contract, you will receive a soulbound token (SBT) representing your staked Citizen. The SBT mirrors the appearance of your staked Citizen and bears the Bank of Neo Tokyo seal. It is not transferrable or available for sale. | As staking necessitates locking the Citizen in a staking contract, you will receive a soulbound token (SBT) representing your staked Citizen. The SBT mirrors the appearance of your staked Citizen and bears the Bank of Neo Tokyo seal. It is not transferrable or available for sale. | ||
[[File:sbt.png|300px|thumb|left|A soulbound Citizen token.]] | |||
<br clear=all> | |||
===Staking $BYTES to Increase Yield=== | ===Staking $BYTES to Increase Yield=== | ||
Once your staking is complete, there is an | Once your staking is complete, there is an optional step remaining: | ||
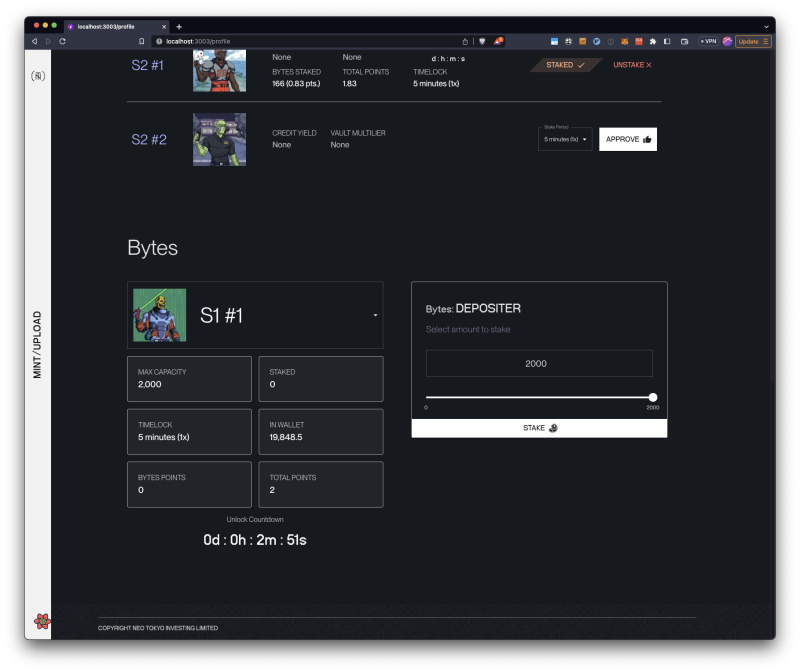
Determine the amount of $BYTES you wish to stake with each Citizen. Staking Bytes with a Citizen increases its yield. Yield is increased every 200 Bytes. | Determine the amount of $BYTES you wish to stake with each Citizen. Staking Bytes with a Citizen increases its yield. Yield is increased every 200 Bytes. | ||
Scroll down the page, select the desired Citizen, and determine how many Bytes will be staked with the Citizen. | Scroll down the page, select the desired Citizen, and determine how many Bytes will be staked with the Citizen. | ||
[[File:stake3.png|800px|thumb|left|Determine how many Bytes will be staked with the Citizen.]] | |||
<br clear=all> | |||
For more information on [[Bytes]], read the Bytes 2.0 tokenomics paper here: https://docs.google.com/document/d/1XJjFP350JSSEhdbiLUp3A9fKPIDvIbZEM38KLF4p5Ww/edit | |||
== Troubleshooting == | == Troubleshooting == | ||
| Line 53: | Line 64: | ||
* Update your hardware wallet. | * Update your hardware wallet. | ||
* Update your browser. | * Update your browser. | ||
* Use Google Chrome. | |||
* Use a desktop or laptop. | * Use a desktop or laptop. | ||
* You may need to approve additional transactions. Most processes require at least two approvals. | |||
* Disconnect your wallet from the site, clear your cache, and reconnect. | |||
* Metamask: Make sure you're connected to the Ethereum network. | * Metamask: Make sure you're connected to the Ethereum network. | ||
* Metamask: Ensure the NFT is listed in the “NFT” tab in Metamask and not in the “Token” tab. | * Metamask: Ensure the NFT is listed in the “NFT” tab in Metamask and not in the “Token” tab. | ||
* | * Bytes and Metamask: When staking Bytes, Metamask requires a [https://support.metamask.io/hc/en-us/articles/6055177143579-How-to-customize-token-approvals-allowances-with-custom-spend-limit custom spending cap] on the amount of Bytes tokens to be used in the staking contract. If you can't stake Bytes, your token cap may be too low. | ||
==Contract Address== | ==Contract Address== | ||
https://etherscan.io/address/0xd37ea75dd3c499eda76304f538cbf356ed9e7ed9 | Neo Tokyo Staked Citizen (CTZN): https://etherscan.io/address/0xd37ea75dd3c499eda76304f538cbf356ed9e7ed9 | ||
==See Also== | ==See Also== | ||
| Line 68: | Line 80: | ||
==External Links== | ==External Links== | ||
[https://neotokyo.codes Neo Tokyo] (official website) | [https://neotokyo.codes Neo Tokyo] (official website) <br /> | ||
[https://opensea.io/collection/neo-tokyo-staked-citizen Neo Tokyo Staked Citizen] OpenSea collection | [https://opensea.io/collection/neo-tokyo-staked-citizen Neo Tokyo Staked Citizen] OpenSea collection <br /> | ||
[https://docs.google.com/document/d/1XJjFP350JSSEhdbiLUp3A9fKPIDvIbZEM38KLF4p5Ww/edit $BYTES 2.0 Tokenomics] Google doc | |||
Latest revision as of 10:08, 18 July 2023
Staking secures a Neo Tokyo Citizen or Outer Citizen in a smart contract for a period of time. In the context of the Neo Tokyo project, staking provides $BYTES yield. Outside of the context of Neo Tokyo, staking is a common practice for NFT projects, cryptocurrency, and blockchain protocols.
Benefits of Staking
Passive Income
Staking Citizens and $BYTES enables individuals to earn a passive income or yield that would not be possible if their tokens were left idle in their wallets. This yield accumulates daily and can be claimed at any frequency.
Increased Earnings
The staking system rewards participants who stake for longer durations and with increased Bytes yield. Staking offers the potential for enhanced earnings, particularly for those committed to long-term holding.
Community Benefits
Staking in Neo Tokyo incentivizes community engagement. As more Citizens are staked, the daily emission of Bytes increases, benefiting the entire community. Increased participation translates into greater rewards for all involved.
It is crucial to remember that while staking offers significant rewards, it is not without risks, including potential losses if token values decline. As with any investment, individuals should assess their risk tolerance and investment objectives.
How to Stake a Citizen and Bytes
Migration Requirement
Before engaging in staking, ensure that you have migrated your citizens by following these steps:
- Visit the website: https://neotokyo.codes/.
- Locate the white vertical bar on the left labeled 'Mint/Upload' and click on it.
- Choose 'CODES_MIGRATION.EXE'.
- Connect your wallet.
- Provide approval for the NT NFT Collection(s).
- Click on 'Migrate' to complete the process.
Staking via the Official Site
Now that you have completed the migration, let's proceed with staking your Citizen by following these simple steps:
1. Return to https://neotokyo.codes/ and connect your wallet using the option in the top right corner.
2. Once your wallet is connected (indicated by a green glow), click on it.
3. Choose your Citizen and approve them for staking.
4. Decide the desired staking duration for your Citizen, selecting from the available options: 1 month, 3 months, 6 months, 1 year, or 2 years. Keep in mind that longer staking periods yield greater rewards, but the Citizen cannot be unstaked until the chosen period concludes.
5. If your S1 Citizen does not have a vault already attached, you are able to select an unattached vault to stake with your Citizen for the same staking period.
6. When ready, click on the "stake" button (depicted by a steak icon ).
Soulbound Citizen Token
As staking necessitates locking the Citizen in a staking contract, you will receive a soulbound token (SBT) representing your staked Citizen. The SBT mirrors the appearance of your staked Citizen and bears the Bank of Neo Tokyo seal. It is not transferrable or available for sale.
Staking $BYTES to Increase Yield
Once your staking is complete, there is an optional step remaining:
Determine the amount of $BYTES you wish to stake with each Citizen. Staking Bytes with a Citizen increases its yield. Yield is increased every 200 Bytes.
Scroll down the page, select the desired Citizen, and determine how many Bytes will be staked with the Citizen.
For more information on Bytes, read the Bytes 2.0 tokenomics paper here: https://docs.google.com/document/d/1XJjFP350JSSEhdbiLUp3A9fKPIDvIbZEM38KLF4p5Ww/edit
Troubleshooting
If you are having issues staking, try the following to resolve…
- If staking, ensure that you migrate your assets to the new contracts first.
- Update your hardware wallet.
- Update your browser.
- Use Google Chrome.
- Use a desktop or laptop.
- You may need to approve additional transactions. Most processes require at least two approvals.
- Disconnect your wallet from the site, clear your cache, and reconnect.
- Metamask: Make sure you're connected to the Ethereum network.
- Metamask: Ensure the NFT is listed in the “NFT” tab in Metamask and not in the “Token” tab.
- Bytes and Metamask: When staking Bytes, Metamask requires a custom spending cap on the amount of Bytes tokens to be used in the staking contract. If you can't stake Bytes, your token cap may be too low.
Contract Address
Neo Tokyo Staked Citizen (CTZN): https://etherscan.io/address/0xd37ea75dd3c499eda76304f538cbf356ed9e7ed9
See Also
External Links
Neo Tokyo (official website)
Neo Tokyo Staked Citizen OpenSea collection
$BYTES 2.0 Tokenomics Google doc


